Getting Started with FussyData + n8n
Introduction
This tutorial will walk you through creating your first FussyData + n8n integration to request and process Excel files automatically.
What is n8n?
n8n is a workflow automation tool that allows you to connect different services and automate processes using a visual interface.
Overview
This tutorial will:
- Create a Submission Request (for an Excel file following a specified schema) in FussyData.
- When an Excel file is submitted to the request, a n8n webhook will be called.
- This will trigger a HTTP Request to get the data of the Excel file that submitted as JSON.
- We will then process this data using Python.
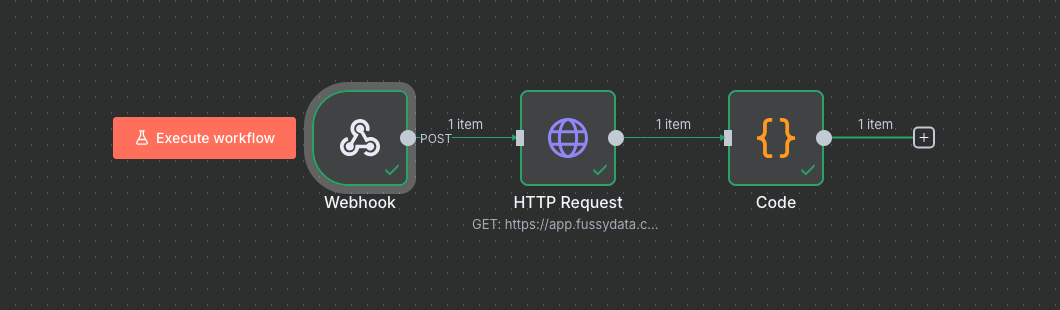
Your final workflow setup will look like this:
Prerequisites
Before starting, make sure you have:
- A FussyData account with API access
- An n8n instance (cloud or self-hosted)
- An Excel file to test with
Step 1: Link FussyData and n8n
1.1 Create New Workflow in n8n
-
Open your n8n instance
-
Click “New Workflow”
-
Give it a name like “FussyData Integration”
-
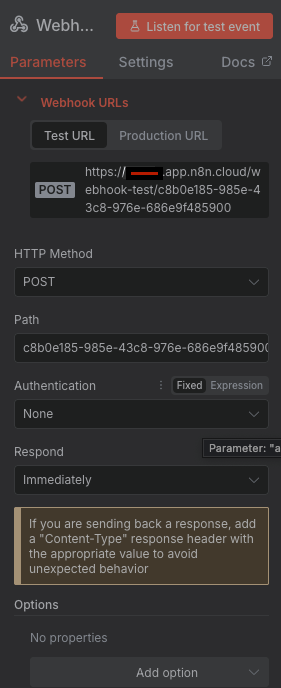
Create a Webhook, make sure it is of type POST, and note the URL (initially you can choose the test URL and repeat the steps later for the production url)
1.2 Log into FussyData
-
Go to app.fussydata.com
-
Log into your account
-
Create a submission request, for instance by choosing “Excel to API”, uploading an Excel template, and finally click “Create File Request”.
-
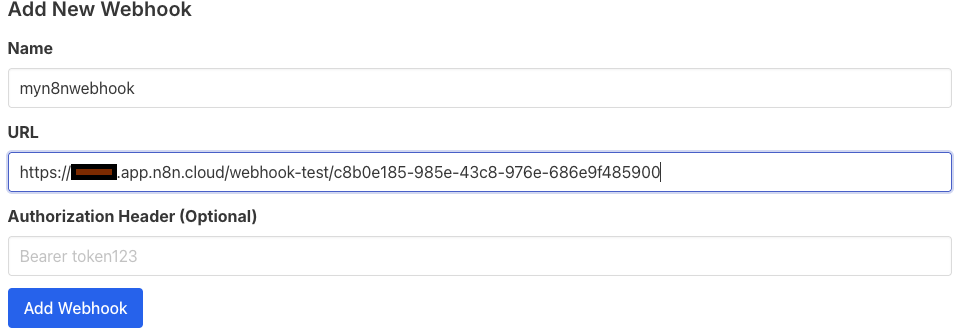
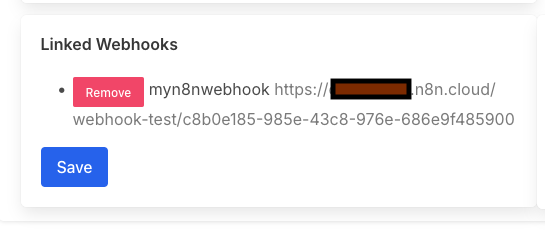
Go to “Webhooks” and add a new webhook for the n8n webhook url.
-
Go to “Submission Requests”, and click “Details” for the newly created Submission Request. Click “Edit File Request” and add your new Webhook under “Linked Webhooks”.
-
Choose “Submit File for this Request” (and if your n8n is in testing listening mode you should see the webhook triggered after uploading the Excel file) and upload your Excel file again (but this time as a submission).
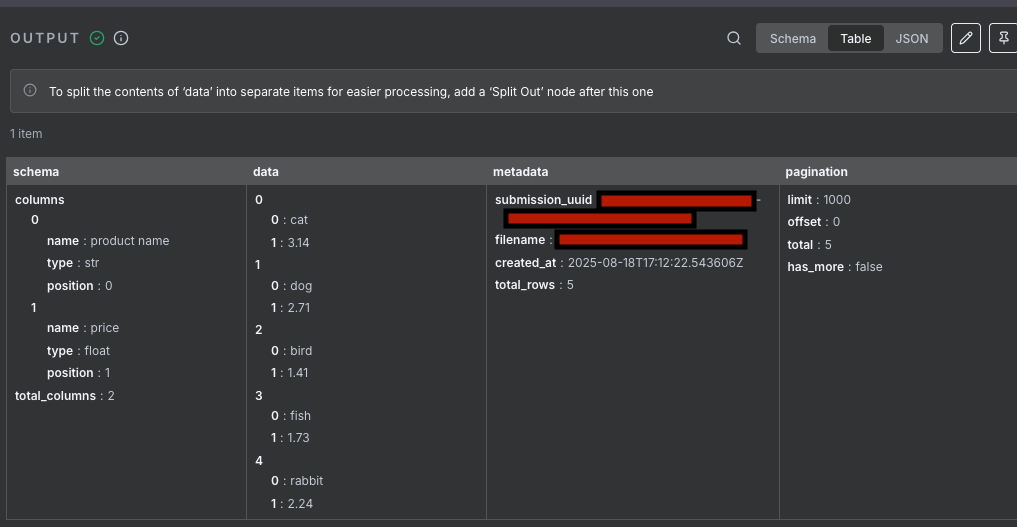
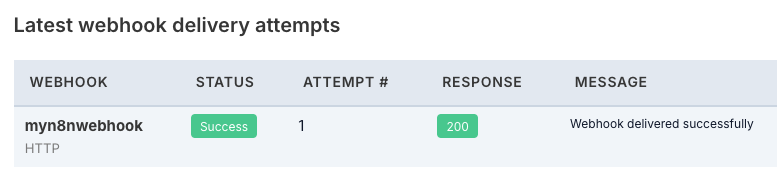
- If you uploaded a test file to your request, go to “Submissions” and click “Details” of your Submission Request. If your webhook worked, you should now see your webhook marked as success under “Latest webhook delivery attempts”. Note the URL under “Latest JSON API Call Example (Get Latest Submission Request Data as JSON)”, it will be of the form https://app.fussydata.com/api/v1/submission_request/uuid/get_latest_json?token_uuid=uuid. (If preferred, this URL can also be constructed without uploading a test file by fetching the API token from “API Tokens”) and the request uuid from the Submission Request “Details” URL.
Step 2: Retrieve the data in n8n
2.1 Handle the webhook in 8n
- Connect the Webhook node top a new HTTP Request node, which calls the /get_latest_json URL noted above.
- Connect the HTTP Request node to a new Code node of type “Python (Beta)”. You can now process the data, for example, you can use this code as a template:
# For n8n Code node with Python (Beta)
output_items = []

for item in items:
    try:
        response_data = item.get('json', {})

        # Extract data
        schema = response_data.get('schema', {})
        data = response_data.get('data', [])
        metadata = response_data.get('metadata', {})

        # Get column names
        columns = schema.get('columns', [])
        column_names = [col.get('name', f'col_{i}') for i, col in enumerate(columns)]

        # Convert to structured format
        structured_data = []
        for row in data:
            row_dict = {}
            for i, col_name in enumerate(column_names):
                if i < len(row):
                    row_dict[col_name] = row[i]
            structured_data.append(row_dict)

        # Create analysis
        analysis = {
            'total_rows': len(structured_data),
            'total_columns': len(column_names),
            'column_names': column_names,
            'metadata': metadata
        }

        output_items.append({
            'json': {
                'success': True,
                'structured_data': structured_data,
                'analysis': analysis,
                'original_data': response_data
            }
        })

    except Exception as e:
        output_items.append({
            'json': {
                'success': False,
                'error': str(e),
                'error_type': type(e).__name__
            }
        })

return output_items
- You are done. Save your n8n workflow. Use this setup to trigger other workflows as appropriate.